
Introduction to Django framework

Table of content
What is web framework
Django
Django features
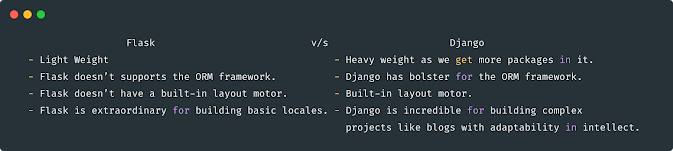
Flask vs Django
Django setup and installation
Create a django project
Register an app and run the project
What is web framework
A web framework is a collection of modules, packages and libraries to speed-up the web development.

Django
Django is a Python Web framework. It follows MVT Design Pattern. M stands for Model which deals with data accces layer. T stands for template engine which represents the presentation layer and View is the controller that holds the business logic of the application.
Django features:
1. Rapid development - easy to setup and build a new project.
2. Django provides different components like authentication, model, modelforms, etc, which helps in development
3. Security - Django provides features to secure the project.
4. Scalability - Django applications are highly scalable.
Other Python Web Frameworks
Cherry pie
Web2Py
Pyramid
Useful VS Code Extensions
Python extension by Microsoft
Prettier to auto format the code
Auto Rename Tag to rename HTML tag
Django Set up
Python installation is required. Need to setup virtual environment before installing django.
Set up virtual environment
installing virtual environment using : pip install virtualenv
To set up a virtual environment run : python -m venv <env-name>
Activate the virtual environment by running the activate script : .\<env-name>\Scripts\activate
Deactivate the virtual environment by running the deactivate script : .\<env-name>\Scripts\deactivate
Note: Virtual environment is useful to install packages in environment without disturbing the other environment. Make sure to activate virtual environment when you are working on project.
How to get the list of packages needed for the application?
We can run python -m pip freeze > requirements.txt
Now requirements.txt will have all the dependencies that we added in our environment.
To install all the packages at once: pip3 install -r requirements.txt
Install Django
Python compatible Django is installed through pip command.
To install Django run the command in the terminal : pip install django <optional-django-version>
To get list off django commands : django-admin
To check version of Django : django-admin --version
To check list of dependencies : pip3 list
In Django we have a project with multiple apps which can be different features of the project. For example for e-commerce project cart is one app, order is one app like wise.
Create a django project
To set up a Django project : django-admin startproject <projectname>
Let's execute the django-admin startproject django_project in the terminal. It creates a new folder called django_project which is the name of our project. It also has a default app created in the project with the same name as project name. Let's run the tree . command in the django_project folder and observe the project structure.
django_project$ tree .
.
├── db.sqlite3
├── django_project
│ ├── __init__.py
│ ├── __pycache__
│ │ ├── __init__.cpython-39.pyc
│ │ ├── settings.cpython-39.pyc
│ │ ├── urls.cpython-39.pyc
│ │ └── wsgi.cpython-39.pyc
│ ├── asgi.py
│ ├── settings.py
│ ├── urls.py
│ └── wsgi.py
└── manage.py
2 directories, 11 files
django_project$
Let us understand the django project folder structure. As you can see at the root of the project folder we have two files, one db.sqlite3 which is the default lightweight database used with the project and a manage.py file is the command-line utility used to run administrative tasks for the project and to run the project.
In the default app django_project, we have a settings.py file where we can configure the INSTALLED_APPS, MIDDLEWARE, TEMPLATES, DATABASES, AUTH_PASSWORD_VALIDATORS, etc.
We also have a urls.py file that is used for mapping configuration of routes URL to views.
To create a Django app : python3 manage.py startapp <appname>
Let's create a new app called peekone_app, by running the command python3 manage.py startapp peekaone_app . This command is run at the root project folder, in this case its django_project.
django_project$ tree .
.
├── db.sqlite3
├── django_project
│ ├── __init__.py
│ ├── __pycache__
│ │ ├── __init__.cpython-39.pyc
│ │ ├── settings.cpython-39.pyc
│ │ ├── urls.cpython-39.pyc
│ │ └── wsgi.cpython-39.pyc
│ ├── asgi.py
│ ├── settings.py
│ ├── urls.py
│ └── wsgi.py
├── manage.py
└── peekone_app
├── __init__.py
├── admin.py
├── apps.py
├── migrations
│ └── __init__.py
├── models.py
├── tests.py
└── views.py
4 directories, 18 files
django_project$
How to register app to project?
To register the new app to the project, add the app to the INSTALLED_APPS configuration in django_project/settings.py The config of the class path is added as (<app_name>.apps.class_name) to the config INSTALLED_APPS in django_project/settings.py file.
In the new created peekone_app, open the apps.py file. You see the PeekOneAppConfig class. Add this config class as peekone_app.apps.PeekOneAppConfig to settings.py file. The updated INSTALLED_APPS config can be found as below.
INSTALLED_APPS = [
'django.contrib.admin',
'django.contrib.auth',
'django.contrib.contenttypes',
'django.contrib.sessions',
'django.contrib.messages',
'django.contrib.staticfiles',
'peekone_app.apps.PeekoneAppConfig',
]
All the routes are configured in urls.py file of project's default app. Note: It is best practice to maintain urls.py file for each app separately.
How to include apps urls in default apps?
To include the URLs defined in the app in the default app use the include function.
from django.urls import path,include
urlpatterns = [
path('admin/', admin.site.urls),
path('',include('peekaone_app.urls')), # add path for urls file of your app
]
To run the project on light server : python3 manage.py runserver
$ python3 manage.py runserver
Watching for file changes with StatReloader
Performing system checks...
System check identified no issues (0 silenced).
You have 18 unapplied migration(s). Your project may not work properly until you apply the migrations for app(s): admin, auth, contenttypes, sessions.
Run 'python manage.py migrate' to apply them.
January 26, 2022 - 11:48:58
Django version 4.0.1, using settings 'django_project.settings'
Starting development server at http://127.0.0.1:8000/
Quit the server with CONTROL-C.
As you can see the project is running at localhost on port 8000. We can open the browser and hit the localhost at port 8000.
